Google Classroom
How to use this online resource in your class.
Things you can do on Google Classroom:
-
Create a virtual classroom
-
Post announcements
-
Post assignments and due dates
-
Create and post self-grading quizzes
-
Conduct a discussion board
-
Organize class material
*Click on the topic you want to learn more about.
Create a virtual classroom
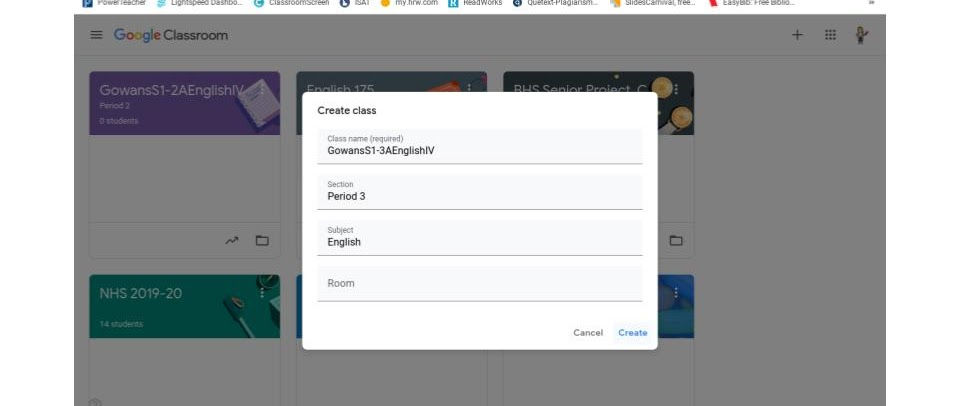
How to create a Google classroom
-
Go to classroom.google.com
-
Click the "+" sign and choose "create class"
-
Title your classroom (teacherlastnameterm-periodnumbersubject (Example: GowansS1-1AEnglishIV))
-
Personalize your page

Click the "+" sign and choose "create class".
Title your classroom (teacherlastnameterm-periodnumbersubject (Example: GowansS1-1AEnglishIV))

Personalize your page.
Click the "+" sign and choose "create class".
Post Announcements
How to use announcements on your Google Classroom
Create an announcement
You can post announcements to one or more classes or to specific students in a class. You can also add attachments.
-
Click on Classroom.
-
Click on the class.
-
Click "Share with your class" and enter your announcement.
Post to additional classes
Announcements to multiple classes are shared with all students in those classes.
-
On the "Stream" page, click "Share with your class".
-
Next to the class name, click "Next >".
-
Tap any additional classes > "Done".
Post to individual students
Unless you're posting to multiple classes, you can post an announcement to individual students. You can't post to more than 100 students at a time.
-
On the "Stream" page, click "Share with your class".
-
Next to the class name, click "Next >".
-
Tap any additional classes > "Done".
Add attachments
You can add attachments, such as Google Drive files, YouTube videos, or links, to your announcement. Google Drive items are view-only to students and editable by co-teachers.
-
Follow the steps above to create a post.
-
Click on "Attach" > choose an option.
-
If you see a message that you don't have permission to attach a file, tap "Copy". Classroom makes a copy of the file to attach to the announcement and saves the copy to the class Drive folder.
-
(Optional) To delete an attachment, next to the attachment, tap "Remove" X.
Schedule an announcement to post later
-
Follow the steps above to create an announcement.
-
Tap "More" : > "Schedule".
-
At "Schedule for date", click the date, select a date, and click "OK".
-
At "Schedule for time", click the time, select the time and click "OK".
-
Click "Schedule". (The announcement will be automatically posted on the schedule date and time.
-
(Optional) To schedule the announcement for another class, schedule it first for one class and reuse the announcement in the other class.
Save an announcement as a draft
-
Follow the steps above to create an announcement.
-
Click "More" : > "Save draft".
Post Assignments & Due Dates
How to post assignments & due dates on your Google Classroom
*If you want to watch videos explaining this, click here for the basic assignment instructions.
Directions
-
Assignments are in the "Classwork" tab. There are 4 types of assignments you can post:
-
A general assignment
-
A Kami assignment (this only works if you and your students have downloaded the Kami app)
-
A quiz (using Google Forms)
-
A question
-
-
The other two options are "material" and "reuse post." If you post material, you cannot assign a due date. It is a way to post material for students to access, but not to complete. Use "reuse post" if you posted an assignment in a different class and want to use it in this one as well.
-
Create a title and instructions for your assignment. Choose which classes it should be assigned to, how many points it is worth, when it is due, and a topic. Using topics is a great way to organize a Classroom. You can do it by subject or date. You can also choose which students should receive the assignment. This is great for ELL or Special Education Students. You can differentiate by assigning different things to different students and they don't have to see all the other possible assignments that they don't need to do.
-
You can also create and assign a rubric and check plagiarism. You can create basic rubrics to reuse in multiple classes to save time. Each class is permitted three times to use the plagiarism checker, so be careful to only assign it to major writing assignments!
-
Next to "assign," you can use the drop down menu to assign, schedule, or save the assignment as a draft.


Create and Post Self-Grading Quizzes
How to create and post self-grading quizzes in Google Classroom.
Google Classroom links to Google Forms for you to create quizzes. You can create a Form straight from Google Classroom, or you can attach a Form you have already created. Please watch this video for a tutorial!
Some Tips:
-
Always make sure you've selected "collect email addresses." If you don't, you won't know which kids earned which scores!
-
If you want to include a fill-in-the-blank type question, select "short answer." When you do the answer key, include any possible answers. Google will mark the answer wrong if you capitalized the answer and the student didn't. If you include both as possible right answers, you don't have to worry about it.
-
If you want the students to write a longer text response, make sure you choose a "paragraph" question. That way students can see their response before submitting it. You can't put a correct answer for a long text response, but you should still include the point value on the answer key so you can grade it.
Discussion Board
How to conduct a discussion board.
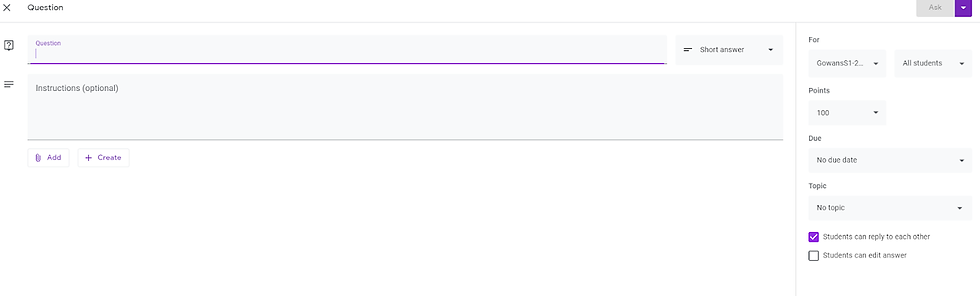
Google Classroom doesn't officially have a discussion board feature, but you can get around this by using the question option.
Directions
-
On the "classwork" tab, click "create," and then "question."
-
Type the discussion prompt under "question" and select "short answer." Then type the instructions under "instructions." You could tell students the number of sentences their response needs to be or specifics they need to include. This is also where you could tell them to respond to other classmates when they're done.
-
Choose the classes, point value, due date, and topic.
-
Add any videos or documents the students need to answer the question. A good prompt would be to have them watch a YouTube video and then write their thoughts about it.
-
Make sure that "students can reply to each other" is checked. You may also want to check " students can edit answer" so that students can fix mistakes on their own post.
-
Post the question.
-
Monitor student response by clicking "view question." If you have students who are posting inappropriately, you can mute them by going to the "people" tab and selecting the options by the student's name.


Organization
How to organize class material.
Here's a quick tutorial for organizing you Google Classroom, including when to label items as assignments vs. tutorials, how to use the calendar on Classroom, and how to see what you need to grade.